Scripting
The Scripting module provides powerful scripting capabilities within the Message Manager application, allowing users to create, edit, and run scripts to automate tasks. You can create scripts to send messages, copy messages, move messages, only process a subset of messages, modify messages, etc.
This feature is only available in the commercial version, but you can use it during the free trial.

Overview
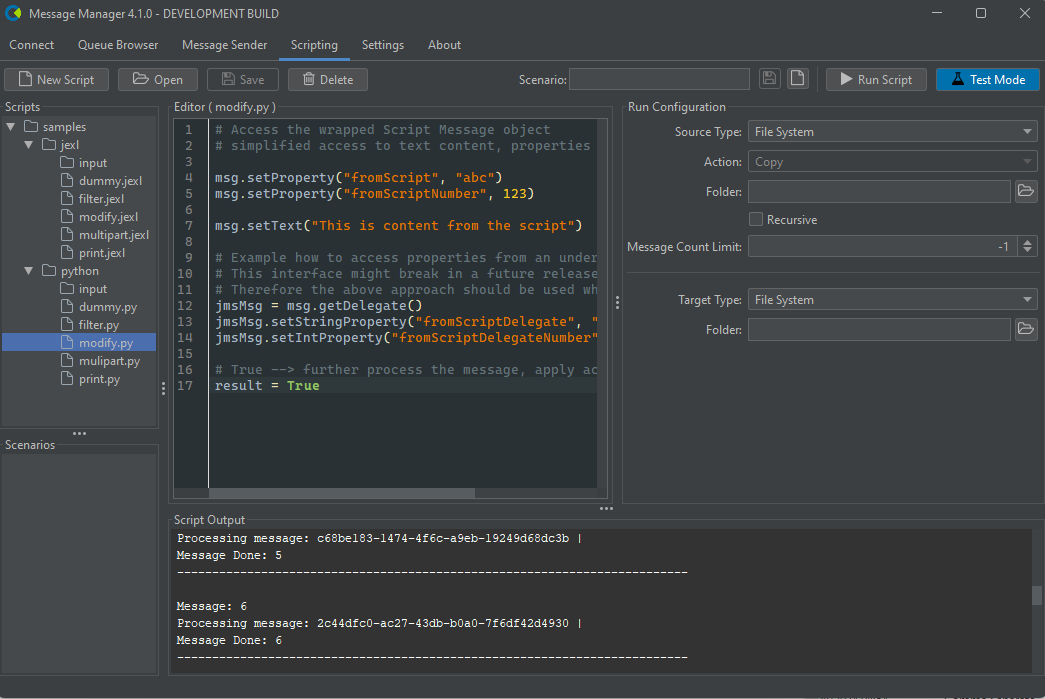
The Scripting tab consists of several key components:
- Script Editor: A large text area where you can write and edit your scripts.
- File Trees:
- Scripts: Shows sample scripts shipped with the product and user-created scripts.
- Scenarios: Displays saved scenarios (scripts with associated run configurations).
- Run Script Button: Executes the currently open script with the current Run Configuration.
- Test/Live Mode Toggle: Switches between test and live execution modes.
You can hide the samples scripts by unchecking the "Show Sample Scripts" option in the Settings panel.
Scripts and Scenarios
Scripts
- The Scripts tree shows sample (see Samples section below) scripts by default (this can be disabled in Settings).
- You can create new scripts or edit existing ones in the Script Editor.
- Scripts can be organized into folders for better management.
Script Language
Scripts can be written in Apache JEXL or Python. The product ships with various sample scripts written in JEXL and Python.
Python Setup
To use Python scripts, you need to have Python installed and on PATH. Furthermore, you need to install Jep:
pip install jep
Scenarios
- Scenarios allow you to save a script along with its run configuration.
- The Scenarios tree is separate from the Scripts tree.
- Like scripts, scenarios can also be organized into folders.
- If you double-click a scenario in the Scenarios tree, it will open and shown as the current scenario above the Run Configuration panel.
- There you can also save it or create a new one.
Writing and Editing Scripts
- Select a script from the Scripts tree or create a new one using the "New Script" button.
- Edit the script in the Script Editor.
- The Save button will become active when changes are made.
Running Scripts
- Ensure a script is open in the Script Editor.
- Choose between Test and Live mode using the toggle button.
- Test Mode: Runs the script without making any modifications, allowing you to check the output.
- Live Mode: Executes the script using the specified Target, potentially making real changes.
- Click the "Run Script" button.
- The script's output will be displayed in the Script Output section.
The Run Script button is only enabled when a script is currently open.
Saving and Managing Scenarios
- Open a script and set up your desired run configuration.
- For a new scenario, click the "New" icon next to the Scenario field.
- Give the scenario a name and click the "Save" icon next to the Scenario field.
- Your saved scenarios will appear in the Scenarios tree.
Settings
The Settings panel allows you to configure various options, including:
- Enabling/disabling the display of sample scripts
- Other scripting-related preferences like the color scheme of the script output
Best Practices
- Use Test mode to verify your scripts before running them in Live mode.
- Organize your scripts and scenarios into meaningful folder structures.
- Add comments to your scripts for better readability and maintainability.
- Regularly save your work using the Save button.
Troubleshooting
If you encounter issues:
- Check the Script Output section for error messages.
- Verify that your script syntax is correct.
- Ensure you're in the correct mode (Test or Live) for your intended operation.
- Consult the application logs for more detailed error information.
For further assistance, please contact the support team.
Samples
Script samples are provided for Apache JEXL and Python. For each language the following samples are available:
dummy
This sample script does nothing. It simply confirms that the message is ok to be processed. For Apache JEXL this means "return true;". For Python this means "result = True".
You may use this if you want to process all messages from a given source.
filter
This sample script filters out messages based on a given condition. By any message that is "ok to be processed" the processing continues. This means the message is copied/moved to the target.
In addition to pure filtering (condition check) this sample also demonstrates how to use the "message" object to access the message's properties. It reads a property called "myProperty" and prints its value. If the value is "abc" the script sets addition properties on the message.
You may use this as a template if you want to process only a subset of messages. Optionally you can also use the "message" object to modify the message.
modify
This sample script modifies a message. It sets properties and sets the message's body. It also demonstrates how to use the "message" Delegate object to access the underlying message object.
The Delegate object should only be used for advanced scenarios as the underlying implementation is subject to change.
You may use this as a template if you want to modify a message before it is sent to the target.
multipart
This sample script demonstrates how to handle multipart messages. Some messaging systems support multipart messages, which consist of multiple parts, each with its own content. The script comes with a sample messages which can be found in the input folder. You can use these messages as a source to test the script.
print
This sample script demonstrates how to print details about a message to the console. It prints the message's metadata, body, and properties.
generate
This sample script demonstrates how to generate messages. It is used in combination with Source Type set to "Generate". "Generate" is a special source type that passes empty text messages to the script. The script is then used to populate the message with data.